pH measurements are vital for maintaining water quality, significantly influenced by the pH sensor's performance. This article outlines a step-by-step guide for calibrating a pH sensor using three buffer solutions (pH 4.01, 7.00, and 9.21) to achieve reliable results. Regular calibration is crucial for ensuring consistent and accurate readings across various applications, thereby enhancing decision-making in research and environmental monitoring.
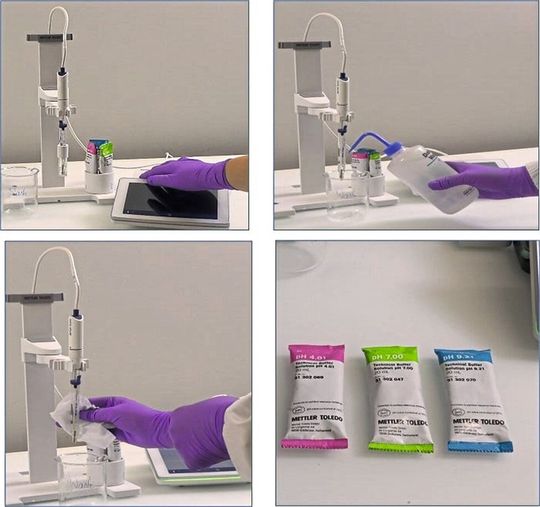
The four steps to prepare the pH meter for calibration.
(Source: Mettler Toledo)
Accurate pH measurements are essential for maintaining water quality. The accuracy of these measurements largely hinges on the performance of the pH sensor and its effectiveness. One of the important ways to ensure that your pH sensor functions correctly is through calibration.
In this article, we will walk you through simple steps to calibrate your pH sensor, helping you achieve reliable results and maintain optimal performance.
1. Calibration Preparation
Turn on the pH meter: Start by plugging in the power supply and turning on your pH meter. Ensure that the electrode is securely attached. If your sensor is equipped with Intelligent Sensor Management (ISM), it will automatically connect once powered on.
Rinse the electrode, dab it dry: Thoroughly rinse the electrode with distilled water to eliminate any residue from its storage solution. Gently dab it dry using a clean tissue paper.
Preparing Buffers Solutions: For accurate calibration, it is recommended to use a three-point calibration with different pH value buffer solutions (pH 4.01 acidic, 7.00 neutral, and 9.21 alkaline). The buffers should be available for calibration to bracket the expected pH, which is around 7.00 in this case. The first buffer, with a pH of 4.01, is considered acidic; the second buffer is neutral at a pH of 7.00; and the third buffer has a pH of 9.21, making it alkaline.
Temperature Considerations: Make sure that all buffer solutions are at the same temperature as the pH meter, as pH measurements can vary with temperature.
Using buffers: Pour each buffer into separate beakers or use single-use sachets for calibration. Avoid keeping buffer solutions in a beaker for more than two hours, and do not return used buffers to their original containers to prevent contamination.
2. Calibration Process
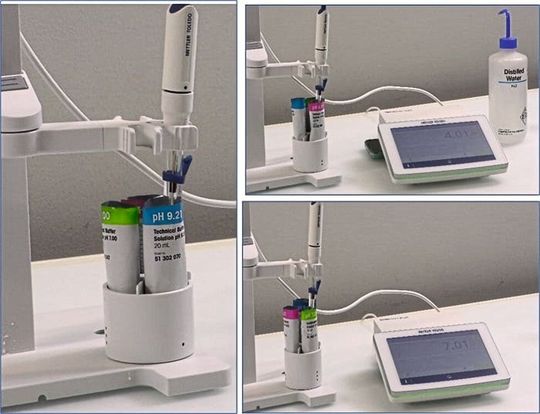
To calibrate the pH meter measure the pH with three different buffers.
(Source: Mettler Toledo)
First calibration point (4.01): Begin by dipping the electrode into the pH 4.01 buffer solution. Initiate the calibration process and wait for the reading to stabilize. Once stable, rinse the electrode with distilled water and gently dab it dry.
Second calibration point (7.00): Next, immerse the electrode in the pH 7.00 buffer solution. Allow the reading to stabilize, then take the second calibration point. Rinse the electrode again with distilled water and dab it dry.
Third calibration point (9.21): Finally, dip the electrode into the pH 9.21 buffer solution and start the calibration. Wait for the reading to stabilize.
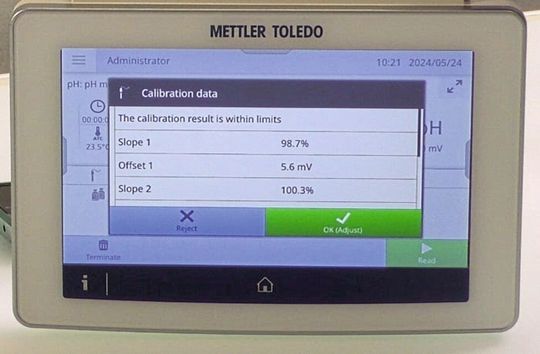
After completing the three calibration points, the meter will calculate the calibration curve data, including the slope and offset. A slope within the range of 90% to 105% and an offset of +/-15 mV indicates that the sensor is in excellent condition.
3. Measurement
Make sure that the calibrations results are stored in the pH meter.
(Source: Mettler Toledo)
Calibration data: The meter pH uses values from three calibration points to ensure accuracy. It automatically selects calibrated data corresponding to the segment in which the pH value of the sample falls.
Measure the sample: Dip the electrode into the water sample and start measurement. Allow the reading to stabilize.
Show measurement data: The pH measurement data will be saved automatically.
Calibrating a pH sensor is essential for obtaining accurate pH measurements. This process helps to ensure that your readings are reliable and consistent. To achieve this, follow the outlined steps carefully, as each one is vital for proper calibration.
Regular calibration is necessary, especially when working with different water samples. By adhering to these steps, you can enhance the accuracy and reliability of your pH measurements, which is crucial for various applications in research, industry, and environmental monitoring. Properly calibrated equipment leads to better decision-making and improved outcomes in your work.
Date: 08.12.2025
Naturally, we always handle your personal data responsibly. Any personal data we receive from you is processed in accordance with applicable data protection legislation. For detailed information please see our privacy policy.
Consent to the use of data for promotional purposes
I hereby consent to Vogel Communications Group GmbH & Co. KG, Max-Planck-Str. 7-9, 97082 Würzburg including any affiliated companies according to §§ 15 et seq. AktG (hereafter: Vogel Communications Group) using my e-mail address to send editorial newsletters. A list of all affiliated companies can be found here
Newsletter content may include all products and services of any companies mentioned above, including for example specialist journals and books, events and fairs as well as event-related products and services, print and digital media offers and services such as additional (editorial) newsletters, raffles, lead campaigns, market research both online and offline, specialist webportals and e-learning offers. In case my personal telephone number has also been collected, it may be used for offers of aforementioned products, for services of the companies mentioned above, and market research purposes.
Additionally, my consent also includes the processing of my email address and telephone number for data matching for marketing purposes with select advertising partners such as LinkedIn, Google, and Meta. For this, Vogel Communications Group may transmit said data in hashed form to the advertising partners who then use said data to determine whether I am also a member of the mentioned advertising partner portals. Vogel Communications Group uses this feature for the purposes of re-targeting (up-selling, cross-selling, and customer loyalty), generating so-called look-alike audiences for acquisition of new customers, and as basis for exclusion for on-going advertising campaigns. Further information can be found in section “data matching for marketing purposes”.
In case I access protected data on Internet portals of Vogel Communications Group including any affiliated companies according to §§ 15 et seq. AktG, I need to provide further data in order to register for the access to such content. In return for this free access to editorial content, my data may be used in accordance with this consent for the purposes stated here. This does not apply to data matching for marketing purposes.
Right of revocation
I understand that I can revoke my consent at will. My revocation does not change the lawfulness of data processing that was conducted based on my consent leading up to my revocation. One option to declare my revocation is to use the contact form found at https://contact.vogel.de. In case I no longer wish to receive certain newsletters, I have subscribed to, I can also click on the unsubscribe link included at the end of a newsletter. Further information regarding my right of revocation and the implementation of it as well as the consequences of my revocation can be found in the data protection declaration, section editorial newsletter.




:quality(80)/p7i.vogel.de/wcms/62/32/62327aaae1415beeed47db6201e79661/0133375912v2.jpeg "A cotton trailer outfitted with benches and a sunshade offers farmworkers a reprieve from the sun as they take a break from picking cantaloupe melons in Firebaugh, Calif.
(Source: Joe Proudman/ Regents of the University of California)")
:quality(80)/p7i.vogel.de/wcms/e6/c8/e6c8bd554776ee1ad2f1f0723fb243a7/0133369387v1.jpeg "Roman road (Source: Queen Mary University of London)")
:quality(80)/p7i.vogel.de/wcms/51/68/51687ac4cc19f2757c138498b877de57/0133167039v2.jpeg "CMFs are foams that consist of hollow spheres – made of materials such as stainless steel, nickel, or other metals and alloys – embedded in a metallic matrix. The resulting material is both lightweight and remarkably strong at absorbing compressive forces. (Source: Jie Sun/ NC State University)")
:quality(80)/p7i.vogel.de/wcms/cd/c0/cdc09efd1e5b3b8f83224e7729d66c10/0133105276v2.jpeg "From the data presented in this report, the authors show how TF3-MALS-RI is uniquely able to separate large polyacrylate molecules and provide precise molecular weight and Rg values. (Source: Postnova Analytics)")
:quality(80)/p7i.vogel.de/wcms/86/01/86014d3d2a28cefc852f65c8d68317e4/0133104231v2.jpeg "Single-handed tube reading using a Handheld 2. (Source: Azenta Life Sciences)")
:quality(80)/p7i.vogel.de/wcms/0b/0f/0b0f8ed042dfc91f32582e10d54c2c7e/0133087444v2.jpeg "Offering advanced automation to increase your throughput, the Intellixcap provides secure sealing – eliminating the need for manual intervention, while preserving vital sample integrity. (Source: Azenta Life Sciences)")
:quality(80)/p7i.vogel.de/wcms/13/d3/13d35105f74a1c2e22b9c7a270e8e9b3/0132611155v2.jpeg "Circulating cell free DNA. (Source: Amsbio)")
:quality(80)/p7i.vogel.de/wcms/bc/ed/bced6850297a04dbea471a66cb6bb6fe/0132611405v2.jpeg "The latest addition to the range is a peristaltic tubing stop adapter that eliminates the need for fixed stoppers and allows custom cut lengths of peristaltic tubing to be installed on any pump head size. (Source: Biotech Fluidics )")
:quality(80)/p7i.vogel.de/wcms/8d/5c/8d5c6c7f897f91d6784825eee20b5584/0133321225v1.jpeg "Empa researcher Christoph Hüglin collects samples of particles that are washed out of the air by rain and snow or settle due to gravity. (Source: Empa)")
:quality(80)/p7i.vogel.de/wcms/a1/af/a1afbc7c8a067bbe94749ec680b4bafd/0133163762v2.jpeg "The study found in murkier water, fish took longer to move towards the food than those in clear water, but individuals in larger groups responded more quickly overall. (Source: Christos Ioannou)")
:quality(80)/p7i.vogel.de/wcms/32/80/3280aa3d44708962943c96fe2d466744/0133088560v2.jpeg "A bumble bee in flight at the University of Bristol Botanic Garden. (Source: Phil Savoie)")
:quality(80)/p7i.vogel.de/wcms/7b/e5/7be5c735140cbe28f3af0ec3d88274b9/0133045403v2.jpeg "After being buried in the ground for two months and broken down by soil organisms, a new pair of cotton underwear (left) shows clear signs of decomposition (right). (Source: Nicolas Zonvi)")
:quality(80)/p7i.vogel.de/wcms/ef/68/ef68375729607984e5bb0c143afdae70/0133375119v2.jpeg "Printed Rice-Lentil 3D structures
(Source: SUTD)")
:quality(80)/p7i.vogel.de/wcms/bf/d0/bfd087349a85956a7aefad57ac1204c7/0133241961v2.jpeg "The Thermo Scientific Suretect Beverage Spoilage Multiplex PCR Assay provides a fast, broad-range molecular solution for detecting key spoilage microorganisms that threaten beverage quality. (Source: © OlegDoroshin - stock.adobe.com)")
:quality(80)/p7i.vogel.de/wcms/d4/61/d461ce0bd5743897993c6475f69e7ad6/0133067478v2.jpeg "In Harris County, 50 % of households with children reported food insecurity, compared with 33 % of households without children. (Source: Rice University)")
:quality(80)/p7i.vogel.de/wcms/79/76/7976d17b980bedfe35acaa532d690046/0132713841v2.jpeg "Observed rice yield losses from 1°C warming are more than twice as high as model estimates due to underestimated heat stress. (Source: AdobeStock/ducvien)")
:quality(80)/p7i.vogel.de/wcms/22/49/224964dd6850b62cccdbc4bde2d34693/0133372964v1.jpeg "Brain activity recorded during a video game helped researchers predict whether participants would take or avoid a risk half a second before they acted. (Source: free licensed)")
:quality(80)/p7i.vogel.de/wcms/48/a7/48a761934161543f70fef2403b44d714/0133372328v2.jpeg "The link between pollution and coughing persisted in the data, even when pollution levels were below the WHO’s recommended safe daily exposure limit. (Source: free licensed)")
:quality(80)/p7i.vogel.de/wcms/83/b4/83b4563a65c6036b61990931507428b4/0133363611v2.jpeg "Magnesium sulphate uptake and the north / south divide for the Precept program. (Source: University of Bristol )")
:quality(80)/p7i.vogel.de/wcms/bb/06/bb06c1c3c5d250f3f93016366c56525d/0133363201v2.jpeg "The team identified more than 1,200 associated genetic variants and found that these influences are remarkably consistent across countries, ages and methods of measuring personality. (Source: Pixabay - PublicDomainPictures)")
:quality(80)/images.vogel.de/vogelonline/bdb/1710600/1710675/original.jpg "Discover how to set yourself up for success when performing balance-based density determination of solids such as jewelry and precious metals. (Mettler Toledo)")
:quality(80)/images.vogel.de/vogelonline/bdb/1682500/1682579/original.jpg "The new XPR Analytical balance redesigned to meet the needs of laboratory technicians of working fast and lean. (Mettler Toledo)")
:quality(80)/images.vogel.de/vogelonline/bdb/1677000/1677080/original.jpg "Enhance your weighing accuracy, comfort and productivity with the redesigned XPR Analytical balance. (Mettler Toledo)")
:fill(fff,0)/images.vogel.de/vogelonline/companyimg/107800/107832/65.jpg "logoDueperthal.jpg ()")
:fill(fff,0)/images.vogel.de/vogelonline/companyimg/131900/131910/65.jpg "Xylem_tag_rgb.jpg ()")
:quality(80)/p7i.vogel.de/wcms/20/40/20401a5f31c584820ae8fd17ebad0203/0131643591v2.jpeg "Fig.1: Achieve dependable dissolved oxygen monitoring in your laboratory with the advanced NineFocus meter and InLab OptiOx Pro-DES sensor. (Source: Mettler-Toledo Technologies)")
:quality(80)/p7i.vogel.de/wcms/88/c9/88c92055b10f9811b3b9328a71dcfb33/0131255382v2.jpeg "Fig.1: A certified standard pH 7 buffer (Source: Mettler Toledo)")